Shared hosting
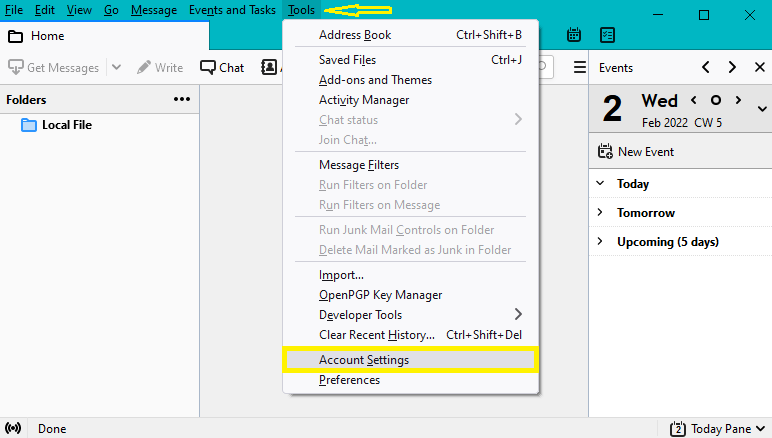
1- Open Thunderbird, click on Tools then Account Settings.

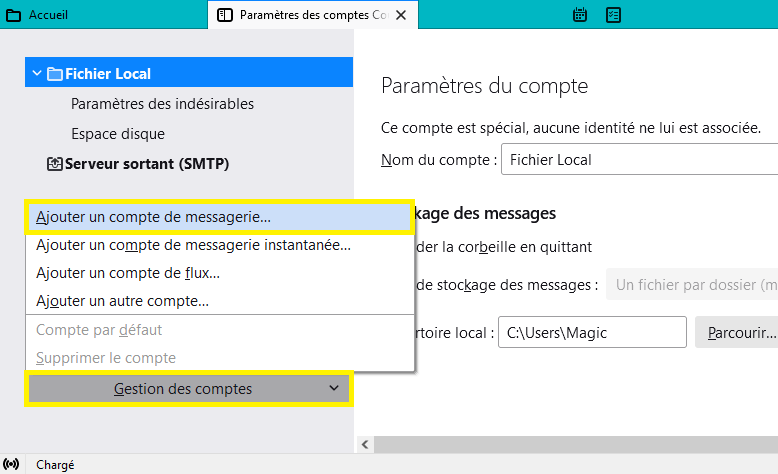
2- Use button Account Actions and Add mail account.

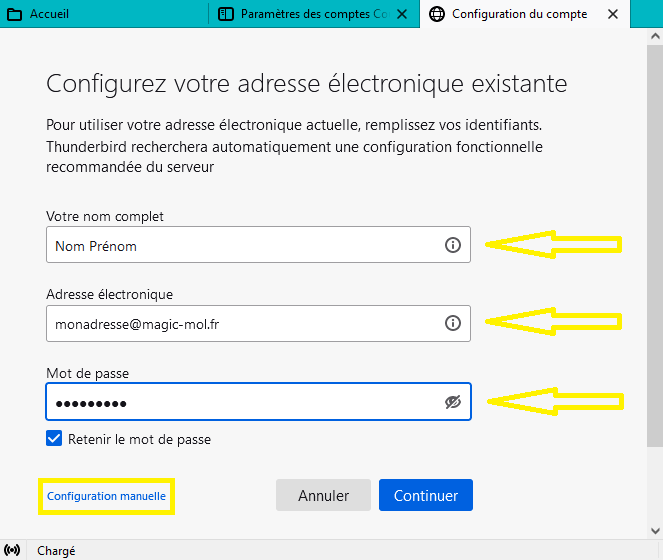
3- Enter your name, the e-mail address and the password. We use myaddress@magic-mol.fr in this example. Click on Configure manually.

4- If the domain points to our DNS servers, and/or is attached to the shared hosting, Thunderbird automatically detects the configuration settings. So there is nothing to edit.
If this is the case, the parameters must be entered manually as follows:
Incoming server : imap.webmo.fr
Port : 143
Connection security : StartTLS
Authentication method : Encrypted password
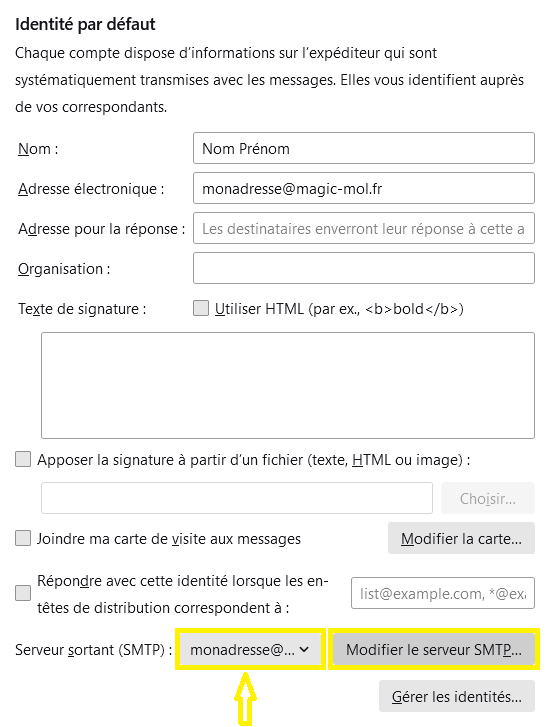
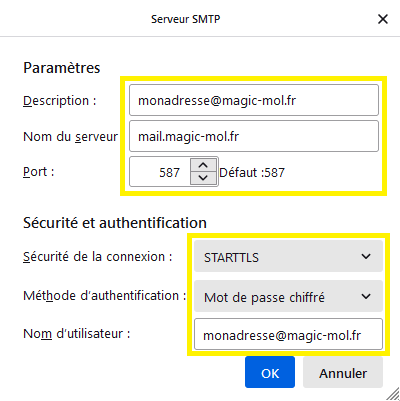
Outgoing server : smtp.webmo.fr
Port : 587
Connection security : StartTLS
Authentication method : Encrypted password
For those who wants to use POP, here are the configuration parameters :
Incoming server : pop.webmo.fr
Port : 110
Connection security : StartTLS
Authentication method : Encrypted password
This help link explains difference between POP and IMAP protocols.
Click Re-test.


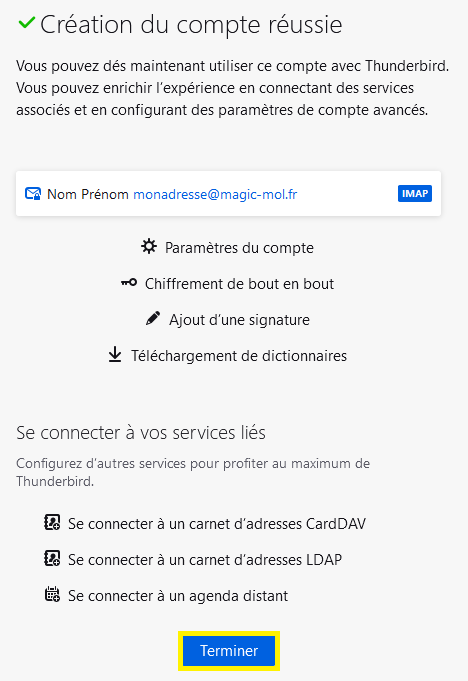
5- Configuration test is successful.


6- Click Done.

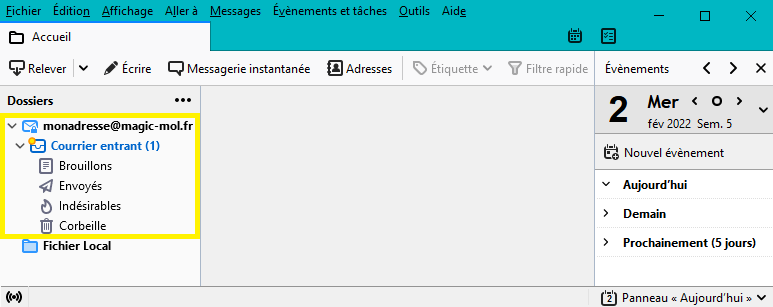
7- Account created.

8- E-mail address is ready.

Plesk hosting
1- Open Thunderbird, click on Tools then Account Settings.
2- Use button Account Actions and Add mail account.
3- Enter your name, the e-mail address and the password. We use myaddress@magic-mol.fr in this example. Click on Configure manually.
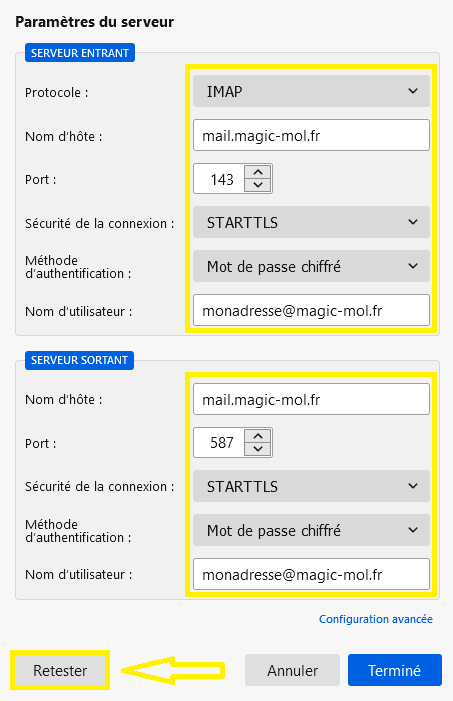
4- set up configuration parameters and replace magic-mol.fr with your domain name for incoming and outgoing server.
Incoming server : mail.magic-mol.fr
Port : 143
Connection security : StartTLS
Authentication method : Encrypted password
Outgoing server : mail.magic-mol.fr
Port : 587
Connection security : StartTLS
Authentication method : Encrypted password
For those who wants to use POP, here are the configuration parameters :
Incoming server : mail.magic-mol.fr
Port : 110
Connection security : StartTLS
Authentication method : Encrypted password
This help link explains difference between POP and IMAP protocols.
Click Re-test.

5- Configuration test is successful.
6- Click Done.
7- Account created.
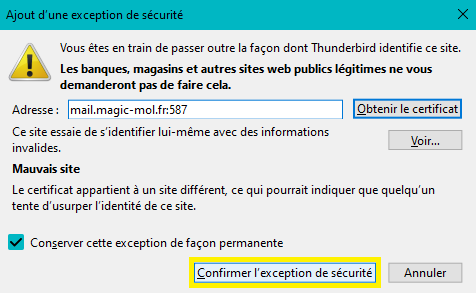
8- Email address is not yet ready for use. You must confirm IMAP security certificate displayed few seconds after the end of set up.

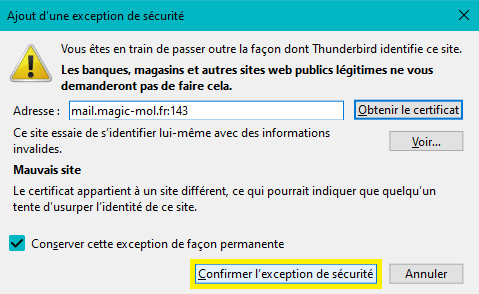
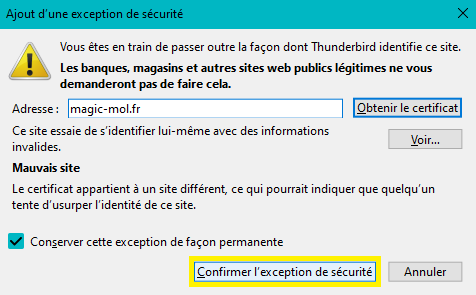
9- Confirm domain name Certificate.

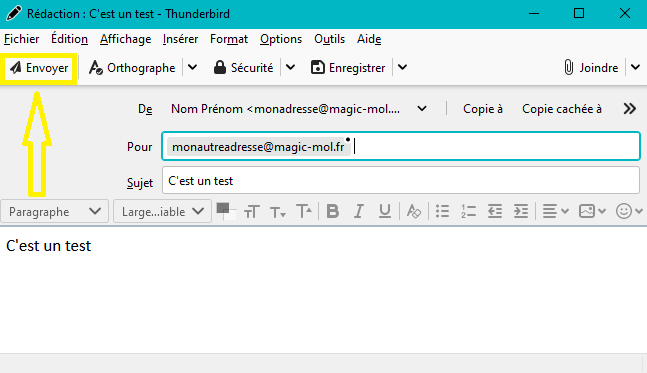
10- Test sending a first e-mail.

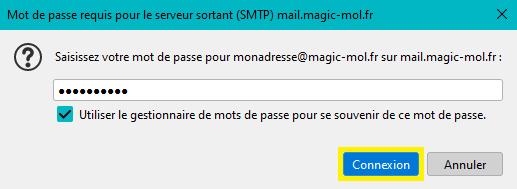
11- Thunderbird displays a pop up to validate SMTP server certificate.

12- Write down password e-mail address.

13- E-mail address is ready.
Connection errors
Thunderbird says username or password is incorrect
1. Make sure you already have created your e-mail account on your customer panel.
2. Change the email address password from the customer panel.
3. Finally check login and password authentication by using Webmail link.
If the connection still fails, then the problem is probably related to your computer's security software, a filtering device on your network, or a restriction on the Internet service provider.
Make sure that ports 143 and 587 are not blocked so far.
If sending an e-mail fails, right-click on the address, then click Settings.

In Outgoing server (SMTP), make sure the correct e-mail address is selected. Click Edit SMTP Server.

Put the right parameters.

If connecting to Webmail is all good, then there are three possibilities :
- You have put wrong settings parameters. It is easier to restart configuration from the beginning.
- After several wrong attempts, your connection has been blocked by our security systems. You have to wait 15 minutes before trying again.
If Webmail connection still fails, your email account may not exist at all or you mistakenly wrote your address or password.
Office 365
1- Open Thunderbird, click on Tools then Account Settings.
2- Use button Account Actions and Add mail account.
3- Enter the name, first name and e-mail address in question. Our example shows monadresse-office365@domaine.tld. Simply change this address to your own, and enter the appropriate password.
Thunderbird offers three types of accounts. We will see the account IMAP and the account EXCHANGE.
IMAP account type
To choose the IMAP type, click on Manual configuration.


Then manually enter the parameters as follows:
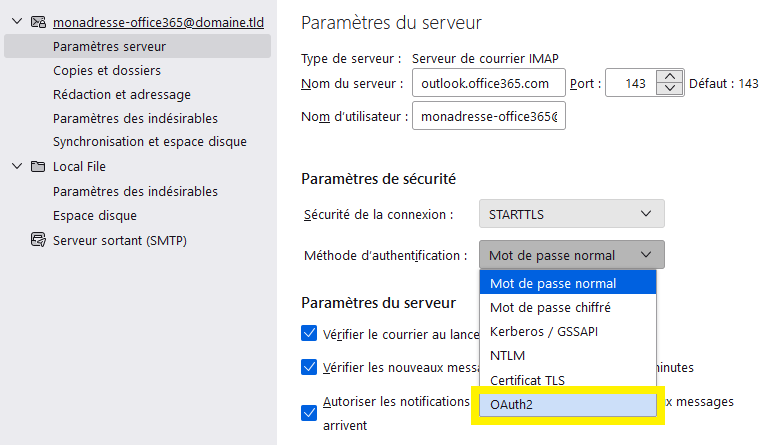
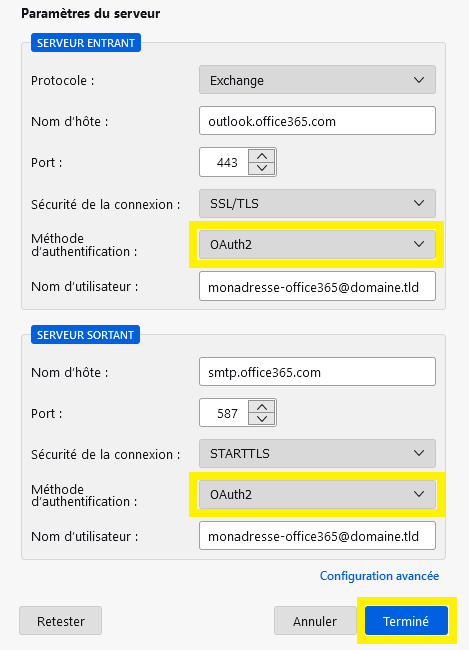
Incoming server: outlook.office365.com
Port : 143
Connection security: StartTLS
Authentication method: OAuth2 (if not found, choose Autodetect)
Outgoing server: outlook.office365.com
Port : 25
Connection security: StartTLS
Authentication method: OAuth2 (if not found, choose Autodetect)

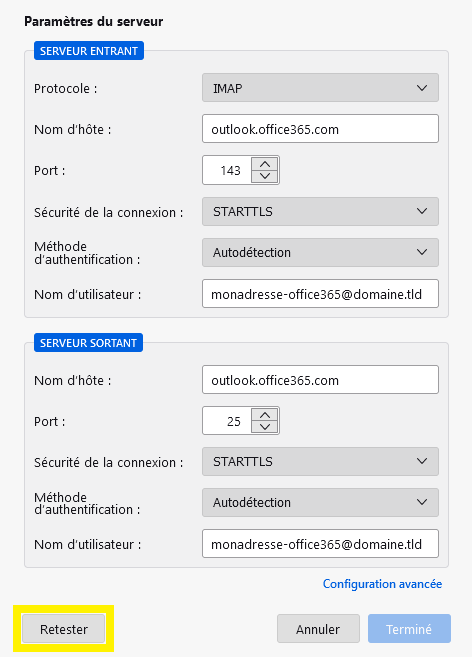
Click Sign In once again. Retest. The configuration test shows a success.
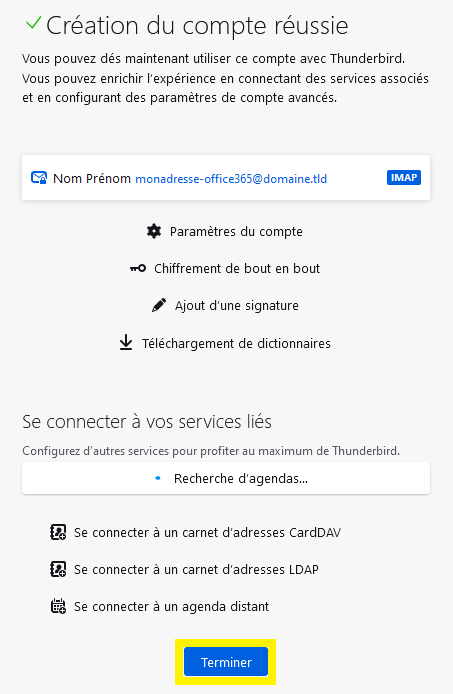
Click on the button Completed.
Once this is done, the account is created.

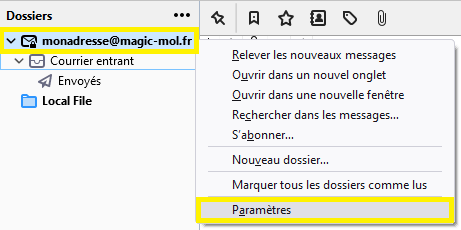
You must return to the page Dashboard to ensure that the authentication method is OAuth2. Right click on the address name, then on Parameters.

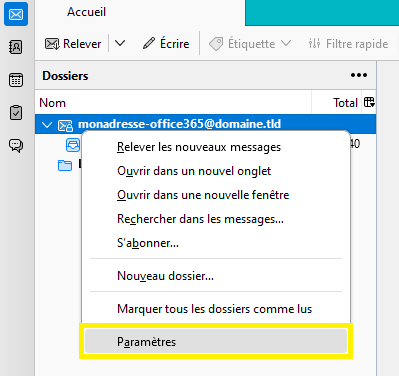
In the section Server settingsfollow Authentication method and choose OAuth2.

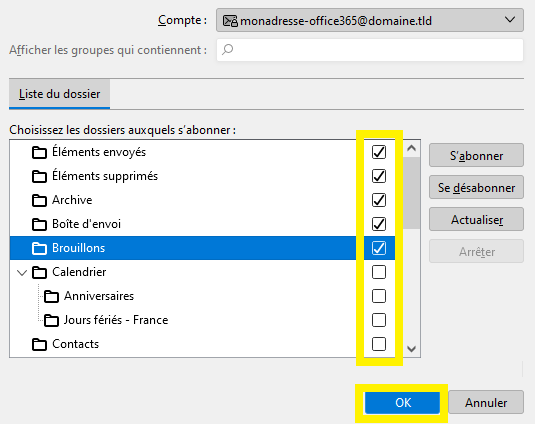
You must now subscribe to the files, and therefore return once again to the page Dashboardright click on the address name, then on Subscribe.


Check the different folders then click on OK.

The address is fully ready for secure email exchange.
Type of account EXCHANGE
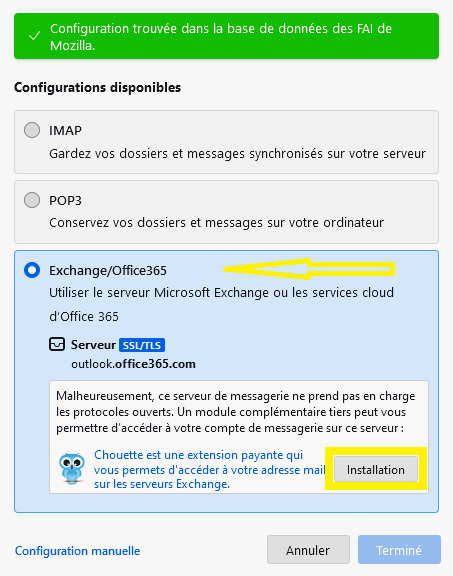
To choose the EXCHANGE type, click on Continue.


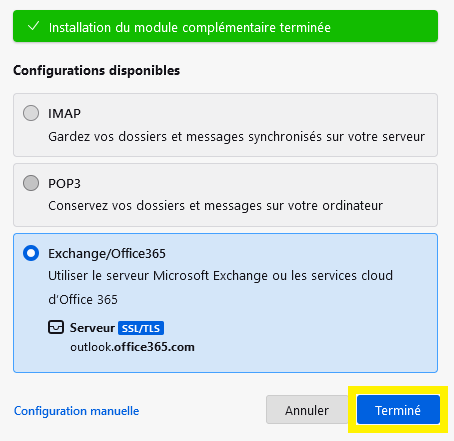
If the domain points to our DNS servers, and/or if it is attached to the shared hosting, Thunderbird automatically detects the configuration settings. So there is nothing to edit, except to use the paid module offered by this email application. Check the box Exchange/Office365.
If the module indicated by Thunderbird is not installed, click on the Installation.
Click on the button Completed.
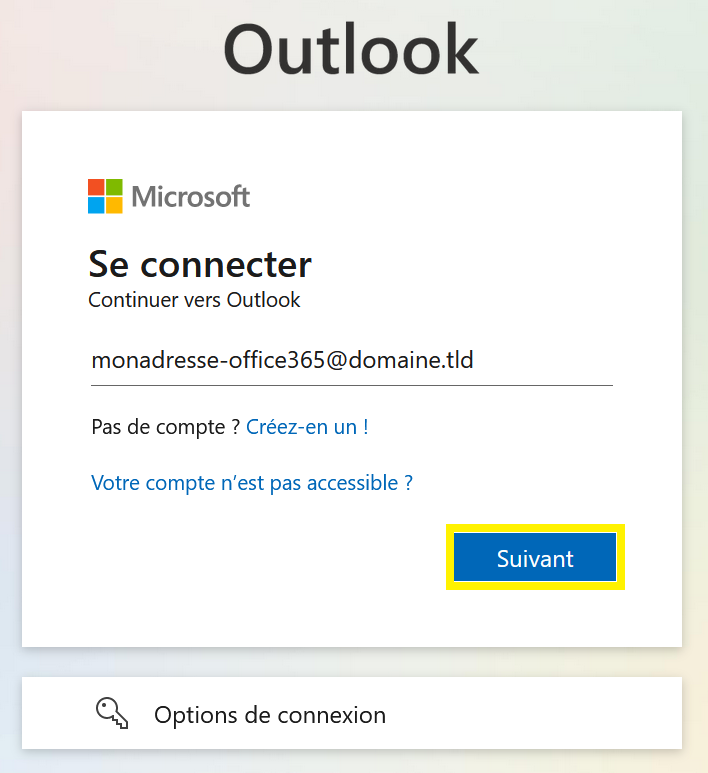
The system will redirect you to the Office365 interface to log in. Simply enter your Office365 email address and password.
Once this is done, the account is created.
There is no need to go back to the Server settings or Subscribe to the folders, because Thunderbird, with its add-on, automatically detects the configuration which will be as follows

The address is finally ready for the secure email exchange.